photog.social is one of the many independent Mastodon servers you can use to participate in the fediverse.
A place for your photos and banter. Photog first is our motto Please refer to the site rules before posting.

Administered by:

Server stats:

271
active users

#homebuilt

1 post1 participant1 post today

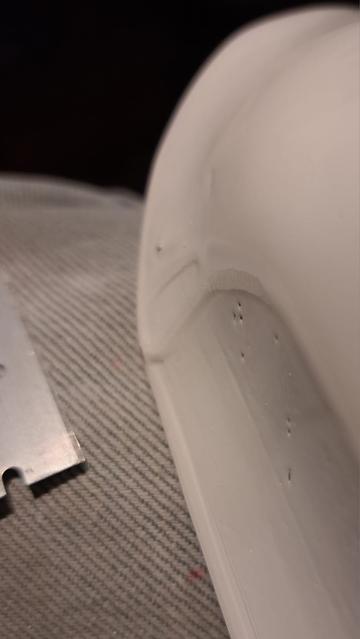
This is part of a fairing that goes over the glider's tail wheel. I'm using this part to develop my skill at scraping paint with a straight edge razor.

This part fits on the underside of the glider, so nobody really looks at it. It is at the end of 21 ft of fuselage, so the air flow by then is plenty turbulent...so I do not need a pristine surface like I do for the first foot or two of the fuselage.

Let's not talk about all the pinnoles, shall we?

Anyway, if the part is convex, or saddle-shaped and I can get the razor across the positive curvature axis to do its work... I can quickly and fairly smoothly scrape down runs and drips to get them almost flush with the rest of the surface. Then I smooth it with 600 and 1200 Grit paper before buffing.

(After I develop my skills on such small belly parts, then I'll be comfortable working on the fuselage, and finally the wings.)

#avgeek #aviation #ElectricAircraft #ExperimentalAviation #homebuilt
#Glider #DIY #Paint #Sand #Buff #Polish

Yesterday was the Tuesday build night at my EAA chapter and one team managed to rivet the leading edge slat brackets to their wing while my team noticed that some of our custom made brackets violated the minimum edge distance for a rivet and so we had to remake them.

Progress is happening though and we're learning from our mistakes.

Our Tuesday build night made good progress on the Zenith kit. I worked on making the leading edge slat brackets while others worked on getting ribs attached to the wings. It's nice working with clear instructions.

Polishing the glider's paint - a brief experiment with an electric dual-action polisher on a test piece.

I used a coarse foam disk and cutting/buffing (not polishing) compound. The machine was at the lowest speed and light pressure was used for a minute or two.

This is a promising follow up to: universeodon.com/@KrajciTom/11

The difference in surface prep was obvious. Where the paint had been sanded with 1200, the surface gained a gloss almost instantly. If the surface was sanded with 600, it remained hazy. Those sections only sanded with 400 were very hazy, even with more polishing time and a bit more pressure.

It looks like I'll hand sand to 1200, then use the electric polisher.

I just had an idea. If I build a bracket/clamp to hold the polisher upside down, I can hold small parts and better control the process.

#avgeek #aviation #ElectricAircraft #ExperimentalAviation #homebuilt
#Glider #DIY #Paint #Sand #Buff #Polish
I need to remove the orange peel texture from my painted parts. I will sand the flaws to remove them.

But then I need to use finer and finer sandpaper to prepare to buff and polish the paint to a mirror finish.

This evening I'm learning how much work it takes to sand away the flaws, and what grit to use. (400? 600?)

And I'm learning how much work is needed at finer grits to prepare for buffing.

If you have ever ground and polished glass, this will be a familiar process.

#avgeek #aviation #ElectricAircraft #ExperimentalAviation #homebuilt
#Glider #DIY #Paint #Sand #Buff #Polish

Tuesday build at the EAA hangar. We started by making some slat support backets for the nose ribs while another team identified the ribs for the wing. An encouraging start to our build as we have nice instructions, a nice kit, and nice videos to help us.

How to remove/demold a part from a fragile part. (Hint: You can create shear in more than one way, and it may be better than creating a peeling action with hammer and chisel.)

The blue Styrofoam that served as the form will be destroyed as it's removed from the fiberglass wingtip weel, but it's a one-off form/mold that lacked any taper.

(This is a follow up to universeodon.com/@KrajciTom/11 )

#avgeek #aviation #ElectricAircraft #ExperimentalAviation #homebuilt
#Glider #DIY #Wing #Epoxy #Fiberglass #Composite #Shear #Peel

Making a custom wingtip wheel for my glider's right wing.

The bottom of the wingtip was covered with clear packing tape, then lightly waxed.

Hot glue temporarily attached the blue Styrofoam mold/form, which also contains the 60mm diameter roller blade wheel.

The part is made from seven plies of 7725 weave fiberglass that will be cut into a triangular shape after wetting with epoxy.

No vacuum bag, so this is a hand lay up. I had to use some small pieces of metal to coax the fiberglass to stay in the correct place.

The garage will be heated overnight so that the part cures, then some tugging and a rubber mallet should separate the part.

#avgeek #aviation #ElectricAircraft #ExperimentalAviation #homebuilt
#Glider #DIY #Wing #Epoxy #Fiberglass #Composite

EAA Build Night at the Chapter. While some of us focused on creating an inventory of parts for the Murphy Rebel we are looking to sell the rest of us focused on cleaning the Zenith CH-750 kit from its 10 years of grime and dust. We were careful not to intermingle the parts and moved things around to store them while we processed things. The weather here is being generous and it is getting warmer.

Over the weekend, I laid up the new landing brake panel. Yesterday, I cut off the excess epoxy. It’ll need some additional work - overall sanding to rough it up and create a decent bonding surface - but I’m really happy with how it turned out.
Also yesterday, I marked where the LB-23 slugs will be placed, and created slots in the fuselage cutout for LB-23 for those slugs.

Yesterday I made the decision to build a new landing brake panel. There’s just too much masking tape debris that’s epoxied to the panel. I’ve already spent some 10 hours trying to sand it off. While I could spend more time sanding it and getting it available, it’ll be much less time to build a new one.
Another part marked “not for flight”.
I already have excess material on hand for this, so I’m not really even losing time on this decision. In fact, I’m gaining time.

Anyway, masking tape bonds really well with epoxy, don’t use it as a kind of mold release. Plastic packing tape, however, works well as a mold release.